Here are our notes to help you plan and make a Roman Blind. We should say that, as with any other bespoke item, there is no single “correct” way! The method we describe here is one we have developed in our own workroom and we hope you find some or all of the techniques useful.
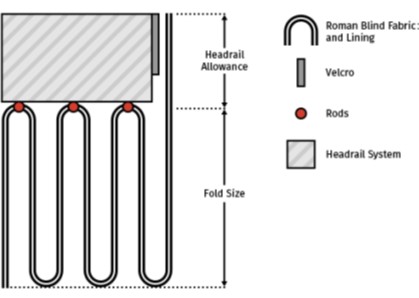
A Roman blind is simply a rectangular panel of fabric supported on a headrail. When fully closed (or lowered), the blind appears as a flat, rectangular piece of fabric covering the window. It is opened (raised) by lifting the lower edge towards the top, resulting in a series of horizontal folds across the blind. To prevent the folds from sagging, horizontal rods are fitted to the back of the blind at appropriate intervals. These intervals determine the fold depth and the final appearance of the blind, and are a crucial element in designing your blind. This is what Roman Blind Wizard will calculate for you!
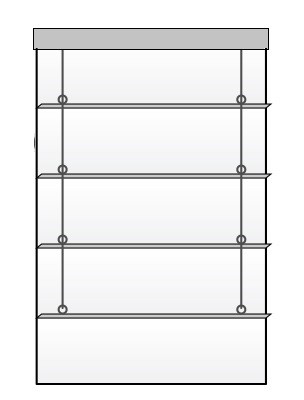
The blind is closed (lowered) and opened (raised) by cords which run vertically down the back of the blind, threaded through cord rings or eyelets on the horizontal rod pockets. The cords are wound onto spools within the headrail system. The spools are mounted on a driveshaft which rotates, turning the spools when the the beaded chain is pulled. The headrail system has a hook Velcro face which adheres to the loop Velcro sewn to the top of the Roman blind. A counterweight at the bottom of the blind ensures that it drops evenly when lowered.
PLEASE BE AWARE OF THE REQUIREMENTS OF BS EN13120
Any blind you make MUST conform to British Standard EN13120. Choose headrails and components which are compliant, and make sure you follow the manufacturer’s instructions for assembly and installation. Young children can become entangled in cord and beaded chain loops, resulting in injury and death. It is YOUR responsibility to ensure that your blinds have been made and installed to be Child Safe.
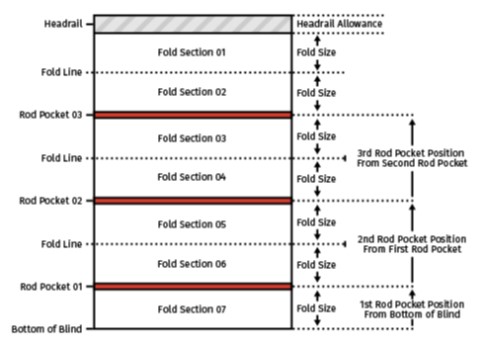
In a standard Roman blind, all the folds are equally sized. When the blind is fully stacked up, all the folds will have their lower edge at the same place.
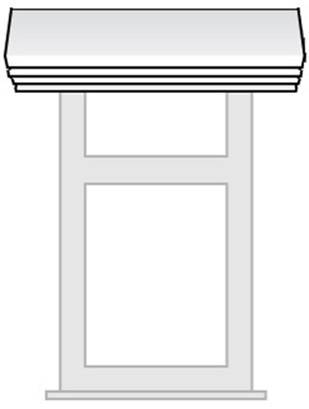
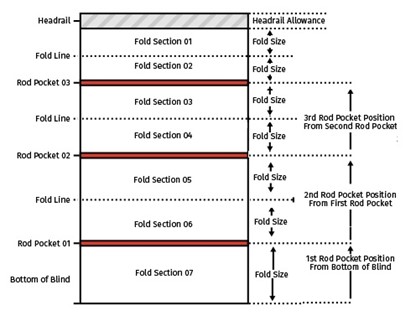
In a cascading blind, each fold is a little larger than the one above, giving a cascading or waterfall effect when the blind is stacked up.
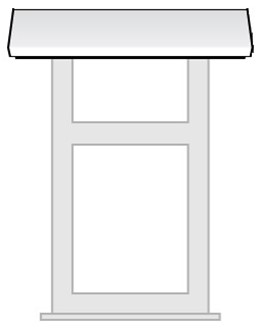
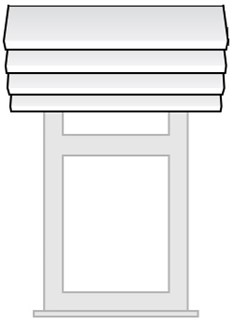
Standard fold blinds will generally occupy less space (and therefore obscure less light/view) than cascading fold blinds. This can be an important consideration when fitting blinds INSIDE the window recess, where loss of natural light needs to be minimised. Cascading blinds will generally occupy more space when folded up, but can look more “dressy” and work well when there is plenty of space outside the window recess.
Roman Blind Wizard performs all the calculations to enable you to see how your blind will stack up with various permutations of fold sizes and other variables (number of folds, headrail allowance and cascade increments).
This example has 3 rods (and therefore 7 fold sections)
This is how the same blind would work with cascading folds.

YOU MUST ENSURE THAT ALL COMPONENTS AND THE HEADRAIL SYSTEM COMPLY WITH BS EN13120
Roman Blind Wizard produces a workroom instruction sheet for a lined and interlined Roman blind, with rod pockets made from the lining fabric, a weight bar enclosed in the face fabric hem, and a machine stitched Velcro heading for use on any headrail system. Roman Blind Wizard calculates the rod pocket spacings for both cascading and standard Roman Blinds.
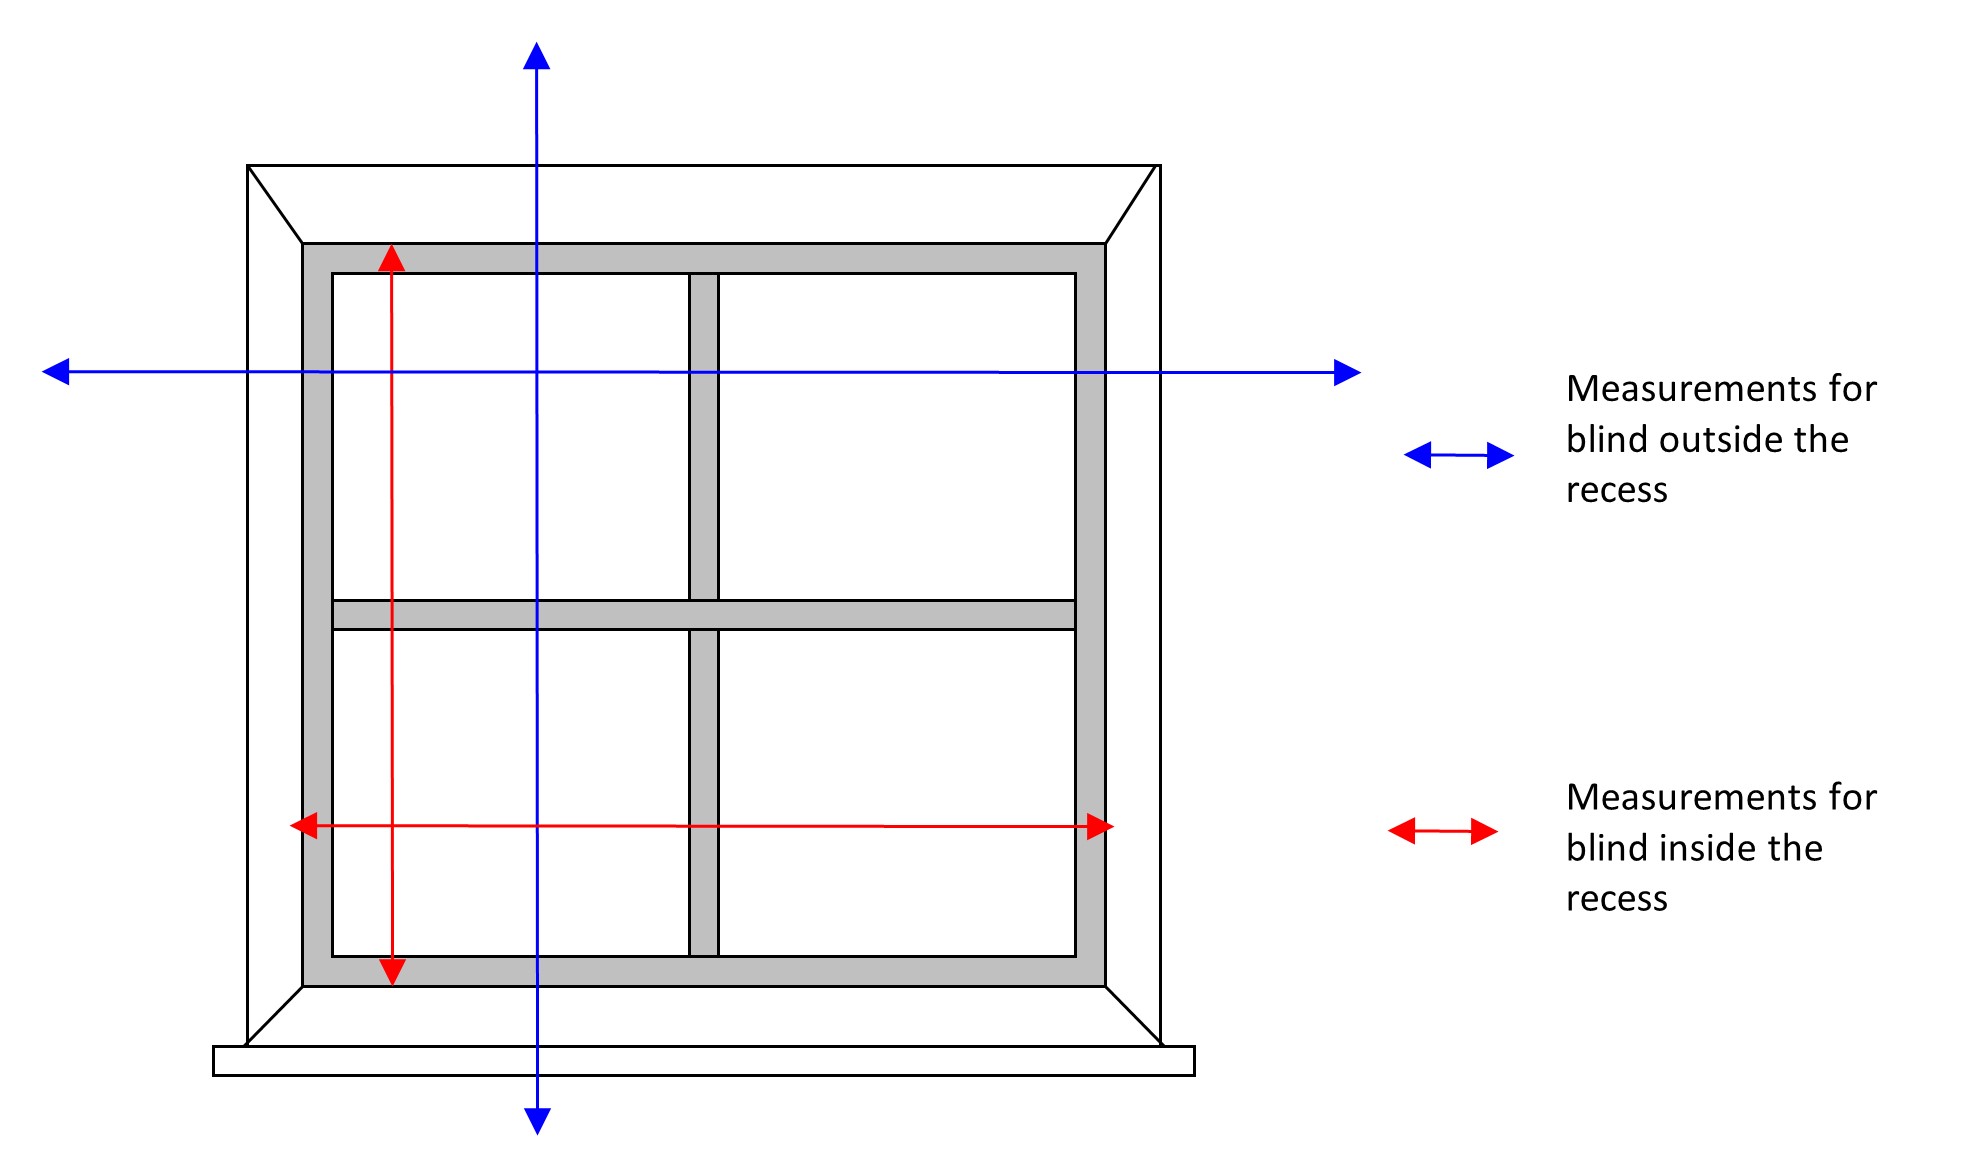
Accurate measurement of window is essential, especially if the blind is to be fitted inside the window recess. Note that windows are rarely true squares, so take measurements at several positions and use the smallest width measurement if the blind is to go inside the recess.
Take several measurements within the window recess.
Make the width of the blind equal to the smallest width measurement inside the recess, MINUS 1cm. This will allow the blind to be raised and lowered without snagging on the sides of the window recess.
Make the length (drop) of the blind equal to the longest length measurement inside the recess, PLUS 1cm. This will ensure that the blind will still reach the sill when fully lowered. Allowing for the natural loss of length caused by folds setting in over time.
Allow for the blind width to overlap the window recess by approximately 5 – 10cm each side, or to match the width of the sill, whichever works best.
Decide on the fixing height of the blind according to the ceiling height, any obstacles and design requirements. For example, you may wish to set the height of the blind exactly mid-way in the dead-space above the recess, or perhaps match the height of a nearby cupboard top. Decide where you want the bottom of the blind to sit – if there is a window sill which protrudes quite far, this will set the bottom position of the blind, otherwise you may allow the blind to extend below the sill for maximum light block.
Enter the information into the Roman Blind Wizard Calculator screen, using the help text to guide you. The Wizard will guide you, as far as possible, to enter logical data at every field, and will calculate and suggest ideal values where appropriate. You can go back to any field and change your entries until you are happy with the specification and the displayed “stacked-up depth” before hitting “calculate” (and using up a credit). If you are “tweaking” a specification by changing values in various field, make sure you tab through all the fields to the final “calculate” button when you have finished entering data, otherwise the Wizard may not receive all the latest input before calculating.
Only click “calculate” when you are sure that you have entered all the data accurately – this is the point at which the Wizard uses up one of your credits.
Enter a description which will identify this window - for example Mrs Smith Master Bedroom bay window left side. Your workroom instruction document will be stored on your account with this reference.
Select a fabric from the drop-down menu. The Wizard will use the information for this fabric (width, pattern repeat, price) to calculate the quantity required to make the blind, and to work out the cost. Over time you can build up a library of fabrics to select here in Your Account/Fabrics. If you prefer not to enter the data for each specific fabric, you could have a few generic descriptions here for example “Customer’s own fabric”, “Plain double width” etc. Using correct fabric information here will help to identify the job in the workroom, and will produce accurate costings for your blinds.
Select a lining from the drop-down menu, or add a new lining by clicking on the “+” sign. The Wizard will use the information for this lining (width and price) to calculate the quantity required to make the blind, and to work out the cost. Over time you can build up a library of linings to select here in Your Account/Linings. Using correct lining information here will provide instructions to the workroom, and will produce accurate costings for your blinds. Leave this field blank if you are not using lining in this blind.
Select an interlining from the drop-down menu, or add a new interlining by clicking on the “+” sign. The Wizard will use the information for this interlining (width and price) to calculate the quantity required to make the blind, and to work out the cost. Over time you can build up a library of interlinings to select here in Your Account/Interlinings. Using correct interlining information here will provide instructions to the workroom, and will produce accurate costings for your blinds. Leave this field blank if you are not using interlining in this blind.
Metric - Enter the exact required width of the finished blind, in centimetres. You can be accurate to 1 mm, for example eighty nine and a half centimetres is entered as 89.5 Imperial - Enter the exact required width of the finished blind, in inches and fractions. You can be accurate to one eighth of an inch, for example, for 34 and a half inches, enter the number 34 then chose ½ from the drop down list of fractions.
Metric - Enter the exact required drop of the finished blind, in centimetres. You can be accurate to 1 mm, for example ninety nine and a half centimetres is entered as 99.5. You should INCLUDE in this drop measurement the depth of any trim which falls below the finished fabric hem of the blind. Imperial - Enter the exact required drop of the finished blind, in inches and fractions. You can be accurate to one eighth of an inch, for example, for 54 and a half inches, enter the number 54 then chose ½ from the drop down list of fractions. You should INCLUDE in this drop measurement the depth of any trim which falls below the finished fabric hem of the blind.
This is the amount of space occupied by the headrail system at the top of the blind – the space into which the fabric of the blind CANNOT physically be folded. This includes not only the headrail itself, but the rings, rod pockets and safety toggles or breakaways which will all require space to sit when the blind is fully stacked up. For an aluminium sidewinder systems we allow a minimum of 6 cm (2 ¼ inches), and more usually 7 cms (2 ¾ inches) here, to ensure that the bulk of the fabric itself is also accommodated and won’t distort the calculated fold positions.
You may wish the final fold of the blind to extend a little further than all the other folds, perhaps to fully display a decorative border or shaped edge at the bottom of the blind, or to prevent sun damage to the other folds. You may also wish to apply a trim (beads, tassels etc) to the bottom of the blind. In this case the bottom edge of the trim will be treated as the bottom of the blind. Enter this additional value (in centimetres or inches), or set to 0 if you do not wish to extend the lower edge. You can re-enter different values here to view the effect on the stacked-up depth, before hitting “calculate”.
The Wizard has calculated the ideal number of fold sections for your blind, based on the minimum / maximum fold size specified in your parameters. You must now decide how many fold sections you ACTUALLY want, and this must be an odd number which should be fairly close to the calculated ideal. You might want fewer fold sections (and therefore bigger folds) on a large blind with a large fabric design. You could decide on more fold sections (and therefore smaller folds) on a narrow blind with a delicate fabric design. Remember that a FOLD SECTION is HALF of the distance between the rods. You can re-enter different values here to see the effect on the stacked-up depth before hitting “calculate”.
A cascading blind is arranged so that when the blind is fully folded up, each fold finishes a little lower than the one in front, giving a cascading or waterfall effect. Standard folds all finish at the same level when the blind is fully folded. Cascading blinds look attractive but take up more space even when fully folded up. If you want your blind folds to cascade then you can enter the cascade increment (the difference between each fold) here. This will normally be between 1 and 5 centimetres (¼ to 2 inches), depending on your design preference and the proportions of the blind. If you want standard (self-stacked) folds then enter zero in this field. You can re-enter different values here to view the effect on the folded depth, before hitting “calculate”.
The Wizard will calculate how much space this blind will take up when it is fully folded up (stacked up). This may be important if you need to know how much of the window will be obscured by the fully raised blind, or if you have to make your blind fit into a certain space. You can re-enter the required number of fold sections, cascade increment, headrail allowance and additional depth on bottom fold to view the effect on the folded depth, before hitting “calculate”.
The Wizard has calculated the exact number of cord drops for this blind width based on normal spacing criteria. (You can change the criteria in Your Parameters.) You must enter a whole number which is close to this. You can specify more cords if this is a particularly long or heavy blind. You should only use fewer cords if this is a fairly small, lightweight blind.
Enter any details about the required headrail system, for example left or right hand operation, safety devices, chain colour etc. You can leave this field blank.
Enter any other instructions, such as borders, trims, fabric orientation and pattern placement which will be required by the workroom to complete the blind. You can leave this field blank.
Only click here if you are sure all the information you have entered is correct for the blind you wish to make. One credit will be deducted from your account, and the workroom instruction sheet will be displayed (for you save as a pdf and print). The workroom instructions will also be saved under Calculations in Your Account.
When you first register with Roman Blind Wizard, you will be allocated a set of default Making Parameters which define the cutting and making allowances for your blinds. You can change these parameters to suit your own preferred method of working.
The following instructions are based on the default Making Parameters, and you should note that the hem allowances, rod pocket sizes etc quoted in the following text may not be the same as your own preferred parameters. To check or amend your Parameters, go to Your Account.
| Measurement | Centimeters | Inches |
|---|---|---|
| Cut Main Fabric Width at finished width plus | 10 | 4 |
| Cut Main Fabric Drop at finished drop plus | 12 | 4 3/4 |
| Cut Lining Width at finished width plus | 2 | 3/4 |
| Cut Lining Drop at finished drop plus | 6 | 2 3/8 |
| Cut Interlining Width at finished width plus | 0 | 0 |
| Cut Interlining Drop at finished drop plus | 5 | 2 |
| Lining allowance for each rod pocket | 2 | 3/4 |
| Maximum Ideal Fold section size | 25 | 9 3/4 |
| Minimum Ideal Fold section size | 10 | 3 7/8 |
| First Cord Position from side edge of blind | 10 | 3 7/8 |
| Max Distance between Cords | 35 | 13 ¾ |
| Cut Fibreglass Rods at finished width minus | 4 | 1 5/8 |
| Cut Weightbar at finished width minus | 2 | 3/4 |
| Standard Useable Fabric Width | 136 | 54 |
Check the fabric for flaws before cutting, and consider how the fabric pattern will be affected by the folds of the blind. Think also about the pattern placement, centralisation and fabric orientation. Following the measurements on the Roman Blind Wizard Workroom Instructions, cut out the face fabric, lining and interlining (if using).
If the finished width of the blind is wider than the fabric, you must join the widths first. (Full width(s) in the middle and half-widths either side.) Consider railroading the fabric, (Turning it sideways) or adding contrast borders to achieve the desired width, as joins can be unsightly.
Always cut SQUARE.
Lay the lining wrong side up and fold in 2 cm along each side edge of the lining.
Lay the lining right side up, with the lower edge closest to you. Using a large set-square, place one side against the folded side edge of the lining, and draw a pencil line at a right angle, about one centimetre up from the bottom edge of the lining, across the entire width of the lining. Use the set square to check that this line is also at right angles to the opposite side of the lining. In this way, your pencil line should be a true right angle to the two sides of the blind. This is the line from which your rod pockets will be measured, so it’s important that it is completely square.
Following the measurements on the Roman Blind Wizard Workroom Instructions, mark the position of the first rod pocket from the pencil line at the bottom edge of the lining. Use a fading marker to draw a line all the way across the lining at this measurement. Draw a parallel line 1 cm up from this line. Check that the lines are at right angles to the folded side edge. (This is to make a 1cm deep rod pocket – adjust if you prefer to make a deeper pocket, but rest assured that the Wizard has calculated SPACES between the rod pockets correctly)
Fold the lining along the top line, wrong sides together, and pin in place, making sure that the folded side hems are maintained, and are level with each other. Check again for exact right angles.
Machine stitch along the first measured line (bottom line).
Mark the position of the second rod pocket by measuring up from the stitching line of the first pocket. Make this pocket as before.
Then measure from the stitching line of the second pocket to mark the position of the third. Repeat until all pockets are complete.
In this way, (measuring from stitch line to stitch line) the measurements calculated by the Wizard will be correct, whatever size rod pocket you make, and even if you use rod pocket tape.
Cut a strip of fusible buckram 5 cm deep and 1 cm less than the finished width of the blind. Have the face fabric on the table, wrong side uppermost and with the top edge closest to you. Position the buckram with fusible side DOWN on the wrong side of the fabric, 4 cm below the cut top edge of the face fabric, and carefully centralised left to right. Fuse in place with the iron.
Press the excess 4 cm of fabric over the buckram. On the right side of the fabric, mark the position for the Velcro. This needs to be 5mm below the folded edge of the face fabric, and 5mm shorter each side than the buckram. Use a fading marker, chalk or just a measuring guide at the machine to position the Velcro for machining.
Machine through the Velcro, fabric and buckram, along each long side of the Velcro. There is no need to machine the short edges of the buckram. You should find that having the buckram on the fabric will prevent any puckering often associated with machining Velcro. Looking at the wrong side now, there will be two rows of machine stitching – one will be holding the raw edge of the face fabric in place, the other will be 5mm from what will become the top edge of the blind.

Lay the face fabric wrong side up with the buckram end (top of the blind) towards you. Lay the bonded interlining, on top of the face fabric, positioned so that there is a 5 cm border of face fabric around the sides, and just a few mm gap between the visible lower edge of the buckram and the top of the interlining.
Fold the buckramed flap (the facing) over the interlining. This might result in the interlining “shunting” down slightly. Smooth out again, ensuring it stays square and central. Secure the two layers together by stabbing with pins.
Normally the “fluffy” side of the bonded interlining should be next to the face fabric, but with bonded blackout interlining it may be better the other way up.
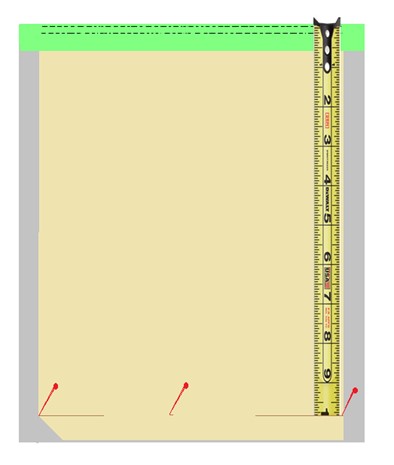
Fold the facing flap over and stab-pin in place. Run a metal tape measure down to the finished drop position. Mark the finished drop measurement at each side of the interlining, and at least once in the middle of the blind (more if the blind is wide). Use pins or a fading marker to mark the finished drop.
Draw a horizontal line on the interlining at the finished drop position for about 20 cms from each corner.
Using a 45 degree template, mark a diagonal line at 45 degrees to the drawn line. This will create a small triangle at each corner of the interlining. Cut the triangles off.
Make single tailor tacks through the fabric at each corner position, and at the other measured drop positions across the blind.
Prepare the mitred corners by folding the face fabric over the diagonal cut on the interlining. Keep the side and bottom edges square.
Use a small piece of double sided tape to hold the vertical edges down (this will stop the weightbar from snagging when you insert it).
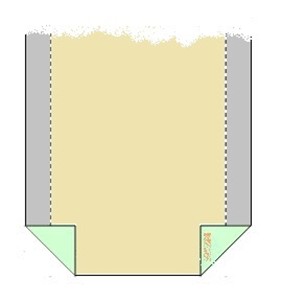
Turn up the 5cm bottom hem (including the interlining), checking the position of the hem against your tailor tacks. Pin in place.
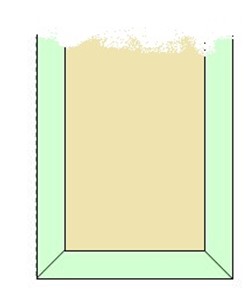
Open out the facing at the top, and turn in the 5cm side hems. These should simply wrap over the sides of the interlining. Pin in place.
Herringbone the side hems, catching only the interlining layer, (not the face fabric). Use herringbone stitch to secure the bottom hem, catching BOTH interlining layers to create a snug fitting channel for the weightbar. Use a fading marker to mark the position of the weightbar before sewing, to ensure you leave a large enough channel. Do not catch the face fabric in these stitches.
Leave the mitred corners open.
With the face fabric wrong side up, mark the calculated positions of all the rod pockets along each side of the blind (reading from the cumulative column on the worksheet). Place the lining on top with the rod pockets uppermost. Make sure you have the lining with the first (bottom) rod pocket towards the bottom of the blind. Your original pencil line should be at the bottom.
Position the lining so that the rod pockets are aligned with their markers on the blind, and the side edges of the lining are equidistant (about 1.5 cm) from the side edges of the blind.
Pin the first rod pocket in place at both sides, and in the centre of the blind, measuring the correct distance up from the hem of the blind. Check the position of the other rod pockets and pin in place. For wider blinds, check the rod pocket positions at several points across the width of the blind. Pin through all thicknesses along each side.
It may help to insert a thin plastic strip into the bottom hem channel (this will prevent accidental stitches closing up the channel). Fold under the hem of the lining and pin in place. Leaving a margin of about 1.5 cms.
Smooth the lining up to the top of the blind and pin in place. The lining should be taut but not pulling in any direction. Trim the excess lining at the top of the blind to the exact finished drop, level with the interlining.
Make large "Z" stitches all across the top of the blind, catching the raw edges of the lining and interlining to the first row of machine stitches in the buckram. Fold the facing over, and gently pull on the "Z" stitches to keep the raw edges at the top of the blind and encourage the facing to lie flat. Secure the thread.
Slip stitch down each side of the lining and along the hem, but do not take the stitches through to the front of the blind. Leave the corners unstitched, leaving enough room to insert the weightbar.
Slip stitch the side and bottom edges of the facing to the lining (and interlining) of the blind. Do not catch the face fabric in these stitches.
Stab stitch through all thicknesses just below the rod pocket machine lines, at the points where the vertical cords will pass. These positions are shown on the Roman Blind Wizard worksheet.
Following the measurements on the Roman Blind Wizard Workroom Instructions, cut the required number of fibreglass rods and the aluminium weight bar to the required size. The hardware cutting allowances are defined in your Parameters.
Beware of fibreglass splinters when cutting the rods. Fit end caps, insert into the rod pockets and close the rod pockets with a few slip-stitches.
Fit end caps to the aluminium weight bar, insert into the hem and close both mitred corners with ladder stitch. Slip-stitch the lining in place around the corners.
Following the measurements on the Roman Blind Wizard Workroom Instructions, sew the required number of cord rings to each rod pocket.
Cut your chosen headrail system to the width specified on the Roman Blind Wizard Workroom Instructions. Decide left or right hand operation and assemble the headrail system accordingly. Attach your blind to the chosen headrail system and thread the cords through the cord rings, securing with a compliant breakaway devices as prescribed by the headrail supplier.
Most headrail systems are supplied with brackets which can be fitted either to the wall or the ceiling, depending on the position of your blind.
Any blind you make MUST conform to British Standard EN13120. Choose headrails and components which are compliant, and make sure you follow the manufacturer’s instructions for assembly and installation. Young children can become entangled in cord and bead chain loops, resulting in injury and death. It is YOUR responsibility to ensure that your blinds have been made and installed to be Child Safe.